
Creating a bootable USB has become very common. More than
once it has happened to us that we have been to install an operating system and
could not find the installation disk or was scratched. Even we can also come to
think it's silly to buy a CD to save an OS and not to use it more often.
Because of all these situations and many more were invented bootable USB. Well,
today we will learn how to create one.
 |
| USB Memory |
For several years now we can take our OS in your pocket or
in our key. I mean carry a USB with our ready to install on any PC operating
system. And although, as I said, is nothing new, many people either do not know
how to copy it or deny it for the sake of the CD, today we show you how quick
and easy it can be to install an operating system on a USB.
Previously we did a tutorial in which we explained how to
install Windows 8 from USB , but following this tutorial can install any OS and
any distribution. Not just the typical Windows or Linux, but also can install
Backtrack, Ubuntu or openSUSE, to give some examples.
What do we need
A USB formatted.
A bootable ISO image of the OS is to be installed.
The program UltraISO .
A BIOS that supports booting from USB (Although for several
years, all support this).
How to create a bootable USB
1. UltraISO begin installing and connecting our USB memory.
2. Once installed, open UltraISO and select the image you
want to copy to the USB.
3. Boot we click on and select Burn disc image.
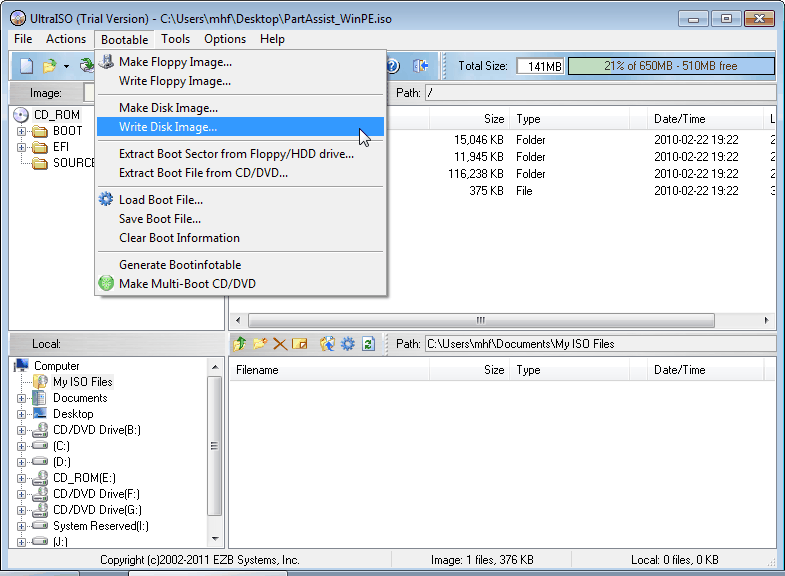
4. In making the above step a window will appear to us. We
look for the unit section and select the drive where our USB memory is mounted
and finally click on Save.
5. Ready! We have our USB bootable operating system with
ready to install.
We can carry our favorite OS in the pocket of our ready to
install in the situation that you least expect jacket.
Installing from USB
1. We insert our USB, if any ejected. We turn off your
computer and enter the BIOS. The process to access the BIOS varies depending on
the computer, but usually when you start a small caption appears at the bottom
showing the key you must press to enter the BIOS.
2. In the Boot section select USB as first choice, or
specifically the USB that contains the operating system as I do. Depends on the
BIOS, the screen varies, but they are practically the same. We kept and left.
 |
| system bios |
3. Once your PC is started, begin installing your operating
system. From here we just need to follow the steps that show us the
installation guide.
After following these few steps, we have learned to create a
bootable USB and install it. We can see that it is extremely easy and has many
more advantages than a Live CD.
0 comments:
Post a Comment
Comments About Blog Post